Code::Blocks
This section is about setting up Code::Blocks for developing Wii U Homebrew using the devkitPPC toolchain.
Preparations
If you didn’t set up devkitPPC already, you may want to follow this tutorial. You should’ve installed the required libraries for plugin development by now as well. If not, check out this page.
Installation
Code::Blocks is a free IDE and can be downloaded here. Install it according to the Code::Blocks homepage.
Setting up the compiler
For Wii U homebrew we generally use custom makefiles but Code::Blocks still needs to have a valid compiler/toolchain set. Using this tutorial we are overriding an existing compiler setting.
If you are using it for non Wii U projects, make sure to make a backup/copy of the settings.
Once you have opened Code::Blocks, you can access the compiler options menu via Settings -> Compiler... on the menu bar.
- Select the
GNU GCC Compiler for PowerPC (HighTec)in the dropdown menu. - Press
Set as default - Click on the
Toolchain executablestab. - Set
Compiler's installation directoryto the bin folder of yourdevkitPPCinstallation (on Windows this usually isC:\devkitPro\devkitPPC\bin) - Set
C compilertopowerpc-eabi-gcc(on Windowspowerpc-eabi-gcc.exe) - Set
C++ compilertopowerpc-eabi-g++(on Windowspowerpc-eabi-g++.exe) - Set
Linker for dynamic libs:topowerpc-eabi-g++(on Windowspowerpc-eabi-g++.exe) - Set
Linker for static libs:topowerpc-eabi-ar(on Windowspowerpc-eabi-ar.exe) - Set
Make programtomake(on Windowsmake.exe) - Save the settings by clicking on
OK
An example configuration can be found here:
Next steps
Now you can turn any existing project into a Code::Blocks project by following this tutorial.
Alternatively, you can use the Code::Blocks template to create a new plugin project from the scratch. A tutorial for this can be found here.
CLion
CLion is a smart cross-platform IDE for C and C++ development.
Preparations
See the Code::Blocks preparations above.
Installation
You can download CLion here.
Setting up the compiler
In CLion you should setup a supported gcc like C/C++ compiler toolchain (not devkitPro!). For Linux this should be pre-installed. If not, you may want to follow this guide. On Windows you need to install something like WSL (recommended) or MinGW/Cygwin. Depending on which toolchain you chose, you need to configure it as the default toolchain in CLion under File -> Settings -> Build, Execution, Deployment -> Toolchains:
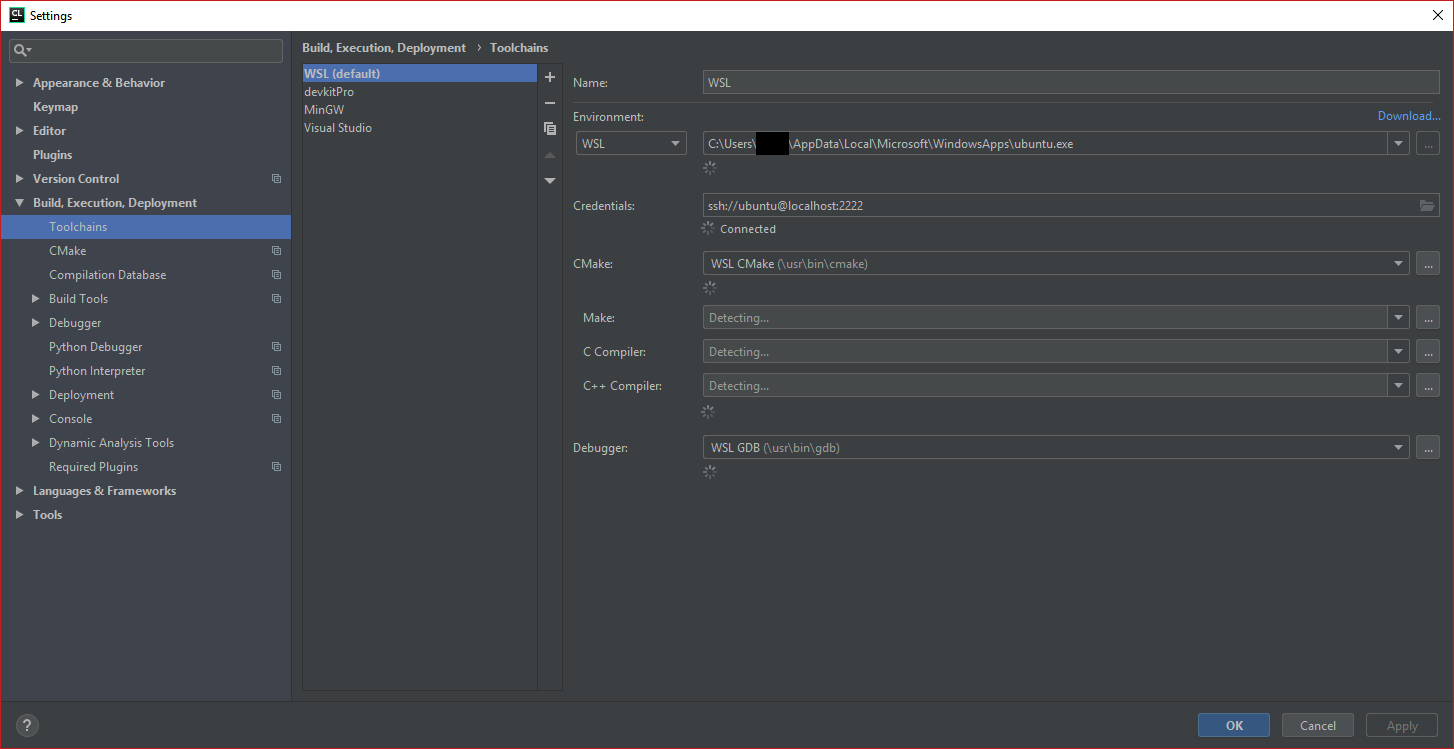 Please note that this toolchain is only needed to provide code inspections on library functions. We’re of course still using
 devkitPro for compiling the plugin.
Beginning a project
You can now use the Code::Blocks template to open in CLion by going to File -> Open... and choosing the project’s root directory. Delete the windows_template.cbp file since it’s not needed.
Getting library code inspections
If you also want to get code inspections on wut or wups functions (highly recommended), you need to create a respective CMakeLists.txt to use CLion’s features to their fullest possible potential:
# We only use this CMakeLists.txt for CLion IDE support, not for building

# Set the minimum required CMake version
cmake_minimum_required(VERSION 3.10)

# Set the project name
set(PROJECT_NAME "example_project")
project(${PROJECT_NAME})

# Set the C++ standard
set(CMAKE_CXX_STANDARD 17)

# Add extra include directories
if (WIN32) # When using a Windows compilation toolchain
    set(WUT "/c/devkitPro/wut/include")
    set(WUPS "/c/devkitPro/wups/include")
else () # When using WSL as toolchain
    set(WUT "/mnt/c/devkitPro/wut/include")
    set(WUPS "/mnt/c/devkitPro/wups/include")
endif ()

include_directories(${WUT})
include_directories(${WUPS})

add_executable(${PROJECT_NAME} src/main.cpp)
Please note that you may need to adapt the WUT and WUPS variable file paths if they are different than the ones specified above.
Compiling
Compiling is still done using the command line/terminal and running the make command. CLion has a built-in Terminal feature for this. Click on View -> Tool Windows -> Terminal to open a Terminal inside CLion:

Video tutorial
If you need some visual aid, I even created a video showing the whole plugin template and compilation setup here.